Tutorial 02 - First Sample Script with UI |
| |
| We will create our first script in this tutorial. This script will create a floating window with a rollout. It will have three buttons that will snap all vertices of all selected objects to the nearest unit. This has come in handy when I have had to make tile based game art. Each vert needed to be on the grid to ensure that the tiles lined up perfectly. |
|
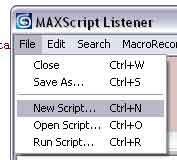 |
The first step is to create a new script. Open the listener window, and select "New Script..." under the file menu. |
|
|
|
We first need to create a floating window to hold our interface. First, we will create a rollout. Then, we will define the floater that contains it. Type in (or copy) the sample code below into your new script.
Rollout vertSnap "Vert Fixer" ( ) objEd =
newRolloutFloater "Vert Editor" 245 450 50 50 addrollout vertSnap objEd |
| |
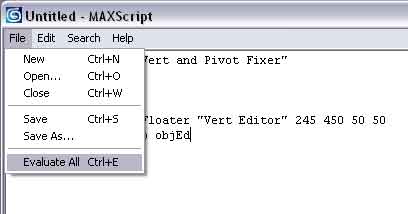 |
Evaluate your script by selecting "Evaluate All" from the File menu.
In newer version of max the "Evaluate" menu item will be moved. |
| |
|
The first line creates our rollout and names it vertSnap. The rollout displays "Vert Fixer." So, the user sees that title, but internally we refer to the rollout as vertSnap.
The ( ) encloses all the commands that will be in the rollout. Since we don't have any commands yet, they are currently empty. We'll be changing that soon.
objEd is the name of our floater. We define it with the newRolloutFloater command. We give it a title for the user and the four sets of numbers are the x,y position of the upper left corner and the x,y size of the floater.
The last line adds the rollout to the floater. So, first we define the rollout, then the floater, and last we assign the rollout to the floater.
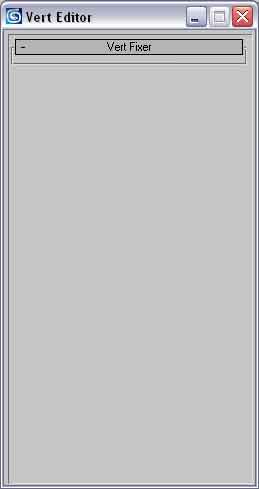
So, now we have an empty window like the one pictured to the left. Next, we'll add some interface items. |
| |
Modify the vertSnap rollout to match the following. You will be adding 6 lines into the parenthesis of rollout vertSnap.
Rollout vertSnap "Vert Fixer"
(
group "Snap verts:"
(
button fixVert1 "1 unit" across:3
button fixVert2 "10 units"
button fixVert3 "100 units"
)
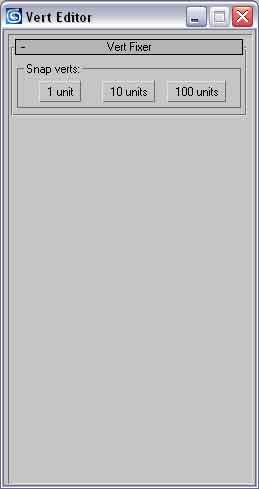
) We have now added an interface to our floater. |
| |
 |
Notice the formatting used in the above block of code. Every set of parenthesis is clearly visible since we indent the code inside it. Using a formatting system that makes code grouping clear is crucial to debugging.
Group is a UI (user interface) command that creates the black rectangle around our buttons. The name in quotes is what the user sees as the name for the group. This looks nice, but is not necessary. You could delete the group line and the set of parenthesis associated with it and the buttons would still be there.
The button command creates a button in the UI. We have the name that maxscript will refer to it followed by the name the user will see in quotes.
The first button has across:3 after it. This is a formatting command that tells maxScript to make all three buttons sit on the same line. Try removing it and rerunning the script. You will see each button is on it's own row.
So, now we have buttons, next we will make them work. |
| |
We need to add these lines to the vertSnap rollout, right below the parenthesis of the group definition.
On fixVert1 pressed do vertMove 1
On fixVert2 pressed do vertMove 10
On fixVert3 pressed do vertMove 100
These lines are triggered when the user presses one of the buttons we created earlier. The on... pressed combination is how we make maxScript see button presses. Remember that we named the first button fixVert1 internally, but the user sees "1 unit" displayed on the button. So, when that button is pressed, we execute vertMove.
What is vertMove? You won't find it in the maxScript list of commands, because we are going to create this function. A function is a little block of code that can be called in our script. We usually create functions if we are going to need to do the same actions repeatedly. Since we have 3 buttons that do almost the same thing, it makes sense to make the code that does this a function. The number after vertMove tells the function the number of units to snap the verts to. So, if the first button is pressed, it snaps to the nearest unit. If the second is press, it snaps to nearest 10, and third is 100. |
| |
Here is our script so far:
Rollout vertSnap "Vert Fixer"
(
	group "Snap verts:"
	(
		button fixVert1 "1 unit" across:3
		button fixVert2 "10 units"
		button fixVert3 "100 units"
	)

	on fixVert1 pressed do vertMove 1
	on fixVert2 pressed do vertMove 10
	on fixVert3 pressed do vertMove 100

)
objEd = newRolloutFloater "Vert Editor" 245 450 50 50
addrollout vertSnap objEd |
| |
|
So far this has been pretty simple. Now, we get to the meat of the script. We must define the vertMove function. Remember that we want this function to look at all selected objects and move their verts to the nearest unit specified.
This is how we define a function. Place it at the very end of your script.
fn vertMove vertScale =
(
)
fn is shorthand for the word function. vertMove is the name of our function, and vertScale is the number we are passing into the function. We end the definition line with an = sign. We then enclose our function in parenthesis.
A function can have any number of variables passed into it. Just list them after the name of the function and before the = you are good to go.
Now, lets put a little functionality in our function.
fn vertMove vertScale =
(
	for K = 1 to selection.count do
	(
	)
)
|
| |
|
We have added a loop to our function. A loop (denoted by the for...do statements) will perform any instructions inside it's parentheses as many times as directed. So, we have set the variable K to loop from 1 to the number of nodes selected which is called selection.count in maxScript. So, if you were to select 4 objects, K would loop from 1 to 2 to 3 to 4 and then proceed onto the next instructions outside the loop.
Loops are a very powerful way to automate repetitive tasks. So, instead of writing code for each object we have selected, we will write the code once, and let the loop apply that code to each selected object automatically.
We now have a function with a loop, but still aren't actually doing anything. Lets change that.
fn vertMove vertScale =
(
	for K = 1 to selection.count do
	(
		if (selection[K].baseObject as string == "Editable Mesh") or
		(selection[K].baseObject as string == "Editable Poly") do
		(
			convertToMesh (selection[K])
			update(selection[K])
		)
	)
)
|
| |
|
We have added a complex if statement and two mesh commands. Lets take a look at the if first. We only want to adjust verts on objects that have verts. Max has many different types of object, such as helpers and space warps that don't have any verts. Trying to adjust verts on objects that don't have any can cause the script to error out. One way to avoid this is with a try..catch command. Another way is to use an if..do statement.
If makes the script ask a question. While we are looping through our selected objects, we want to make sure we are only trying to modify objects with verts. So, we state if an object is an editable mesh or if it is an editable poly then go ahead and start the process of moving the verts. If the object doesn't meet either conditions, then we skip everything in the block of code within the parenthesis.
If is all about comparisons. For example, type this in the listener:
if 5 < 10 do print "wee"
You should see wee printed in the output pane. This is a simple example. The if statement we are creating is much more complex.
The command if (selection[K].baseObject is asking what kind of object K is. The are many different baseObject types, but we are only going to tackle two of them, mesh and poly. So, what is object K? It is each object we have selected. Remember we are in a loop, so this if statement is going to be asked of each object we have selected. That is what selection[ ] means. If you create three spheres, and select all of them, and then type in selection[1] you would see maxScript return the name of one of the spheres. You could replace the 1 with a 2 or a 3, and a different sphere would be selected.
So, instead of manually typing 1,2, or 3, we are using a variable K to loop from 1 all the way to 3, or however many objects we have selected. You can see how powerful this is. We can have any number of objects selected, and the code can handle it.
The as string command converts the baseObject into a string. A string is any character you can type. "This is a string." We convert the baseObject to a string so that we can compare it with another string, such as "Editable Mesh"
This if statement is now hopefully a little clearer. Lets take one last look at the statement:
if (selection[K].baseObject as string == "Editable Mesh") or
 (selection[K].baseObject as string == "Editable Poly") do
This is really saying: If the string value of our currently selected object in the loop is "Editable Mesh" or the string value of our currently selected object in our loop is "Editable Poly" then go ahead and do everything in the parenthesis. |
| |
Now that we understand if a little better, lets take a look at the two mesh commands in the if statement.
convertToMesh (selection[K])

update(selection[K])
The command convertToMesh changes the selected objects into mesh objects. This insures any parametric objects like the box primitive are converted to meshes so that we can run mesh operations on them. If we try to move verts on a non mesh object with the commands that are coming up later, we would get an error.
Once we convert to a mesh, we need to tell Max to update it's internal representation of that object. That is what update does. |
| |
Now we have every object ready to be operated on. Now, we need to set up another loop to go through each vertex of each object.
for L = 1 to selection[K].numverts do
(
currentVert = getVert selection[K] L
)
So, this loop is like all the rest. The new element is the node property numverts. Each mesh object has this property. It is the number of vertices the object has. We will use this value as our end point for the loop. That way, we know we are going through each vert in the mesh and stopping once we hit the last one.
We then make the variable currentVert equal the current vertex on the current object by using the getVert command. The getVert command needs an object name and a vert number. So, selection[K] will loop through all the objects and L will loop through all the verts on each object.
So, lets take a look at what we have so far:
fn vertMove vertScale =
(
	for K = 1 to selection.count do
	(
		if (selection[K].baseObject as string == "Editable Mesh") or
		(selection[K].baseObject as string == "Editable Poly") do
		(
			convertToMesh (selection[K])
			update(selection[K])

         	for L = 1 to selection[K].numverts do
  			(
  				currentVert = getVert selection[K] L
 			)
  		)
	)
) |
| |
Now we are going to use the vertScale value that we have passed into our function.
currentVert.x = float currentVert.x/vertScale
The x component of currentVert is the vertex's position on the x axis. We are going to divide the value by the vertScale value. So, if a vert is located at 130.21 on the x axis, and we want to round to the nearest 100 units, we would divide 130.21 by 100. The divide in max will give us an integer if the currentVert value is an integer, which we don't want, so we specify that we want a float value. So the result of the above line would be 1.3121.
Why are we doing this? Lets take a look at the next step to see.
if currentVert.x - (floor currentVert.x) < .5 then currentVert.x = floor currentVert.x
else currentVert.x = ceil currentVert.x
We are now going to run some tests on the x position of the currentVert. The command floor will give us the nearest integer that is less than the value given. The floor of 1.3121 would give us 1. So, we are going to compare the value of currentVert (in this case 1.3121) and the floor value of currentVert (which is 1.) Ceil will do the opposite. So, the ceil of 1.3 is 2.
If currentVert minus the floor value of currentVert is less than .5 then currentVert is equal the floor value of currentVert, else currentVert is equal to the ceiling of currentVert.
What this line is doing is rounding the number off to the nearest whole number. If the number is closer to 1 (in this example), then currentVert will equal the floor value or 1 in this case. If the number is closer to 2, then currentVert will be set to 2. Since the example value of 1.3121 is closer to 1, currentVert.x is set to 1.
The next step is to multiply the value by the same amount we divided by to get us back to our original position - but now rounded to the nearest 100 units.
currentVert.x = currentVert.x*vertScale |
| |
| So, let take a look at our original example number of 130.21 rounded to the nearest hundred units. We divide it by 100, giving us 1.3121. We then test to see if it is closer to 1 or 2, and discover it is closer to 1. We then round it to 1 and multiply it by 100 giving us 100. So, the vert value will be set using setVert to 100, thus moving the vert to a new position that is rounded to the closest 100 units.
That's all there is to it. Lets take a look at the completed function with x,y and z all taken care of. |
| |
fn vertMove vertScale =
(
	for K = 1 to selection.count do
	(
		if (selection[K].baseObject as string == "Editable Mesh") or
		(selection[K].baseObject as string == "Editable Poly") do
		(
			convertToMesh (selection[K])
			update(selection[K])

         	for L = 1 to selection[K].numverts do
  			(
  				currentVert = getVert selection[K] L

				currentVert.x = float currentVert.x/vertScale
  				currentVert.y = float currentVert.y/vertScale
  				currentVert.z = float currentVert.z/vertScale

				if currentVert.x - (floor currentVert.x) < .5 then
					currentVert.x = floor currentVert.x
				else
					currentVert.x = ceil currentVert.x

				if currentVert.y - (floor currentVert.y) < .5 then
  					currentVert.y = floor currentVert.y
  				else
  					currentVert.y = ceil currentVert.y

  				if currentVert.z - (floor currentVert.z) < .5 then
  					currentVert.z = floor currentVert.z
  				else
  					currentVert.z = ceil currentVert.z

  				currentVert.x = currentVert.x*vertScale
  				currentVert.y = currentVert.y*vertScale
  				currentVert.z = currentVert.z*vertScale

  				setVert selection[K] L currentVert
  			)
  			update(selection[K])
  		)
	)
) |
| |
The last thing we do is update the selection so max knows what changes we have made to the mesh. Lets take a look at the completed script.
Rollout vertSnap "Vert Fixer"
(
	group "Snap verts:"
	(
		button fixVert1 "1 unit" across:3
		button fixVert2 "10 units"
		button fixVert3 "100 units"
	)

	on fixVert1 pressed do vertMove 1
	on fixVert2 pressed do vertMove 10
	on fixVert3 pressed do vertMove 100

)
objEd = newRolloutFloater "Vert Editor" 245 450 50 50
addrollout vertSnap objEd

fn vertMove vertScale =
(
	for K = 1 to selection.count do
	(
		if (selection[K].baseObject as string == "Editable Mesh") or
		(selection[K].baseObject as string == "Editable Poly") do
		(
			convertToMesh (selection[K])
			update(selection[K])

         	for L = 1 to selection[K].numverts do
  			(
  				currentVert = getVert selection[K] L

				currentVert.x = float currentVert.x/vertScale
  				currentVert.y = float currentVert.y/vertScale
  				currentVert.z = float currentVert.z/vertScale

				if currentVert.x - (floor currentVert.x) < .5 then
					currentVert.x = floor currentVert.x
				else
					currentVert.x = ceil currentVert.x

				if currentVert.y - (floor currentVert.y) < .5 then
  					currentVert.y = floor currentVert.y
  				else
  					currentVert.y = ceil currentVert.y

  				if currentVert.z - (floor currentVert.z) < .5 then
  					currentVert.z = floor currentVert.z
  				else
  					currentVert.z = ceil currentVert.z

  				currentVert.x = currentVert.x*vertScale
  				currentVert.y = currentVert.y*vertScale
  				currentVert.z = currentVert.z*vertScale

  				setVert selection[K] L currentVert
  			)
  			update(selection[K])
  		)
	)
) |
| |
|
We could make another function for the repetitive task of rounding x,y and z. Right now we do the same thing 3 times. Also, we could change the buttons to a spinner to allow the user to round the verts to an arbitrary value. Feel free to experiment with the script. Since it is fairly small, you should have little trouble tweaking it. |

|

